
Train Addiction Help Line: 1.866.840.7777
Aug 24, 2011 - O Scale
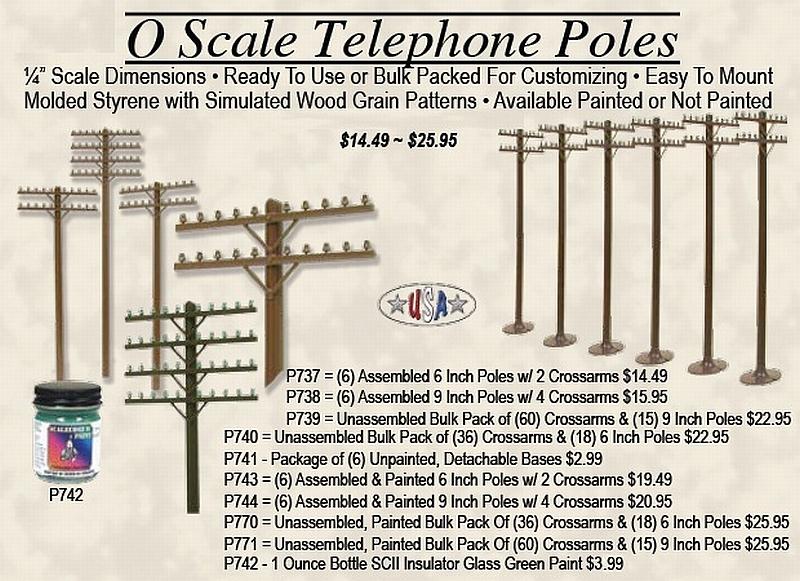
Weaver Has The Most Prototypically Accurate O Scale Telephone Poles On The Market!
![]()
ASSEMBLY INSTRUCTIONS AND MODELING TIPS FOR WEAVER O SCALE TELEPHONE POLES
Congratulations on your purchase of the most prototypically accurate O scale telephone pole on the market! More accurately known as line poles, they could be found along railroad tracks from the earliest days of the railroading until today.
UNASSEMBLED BULK PACKS
These kits allow the modeler to assemble the poles in either standard or custom configurations at considerable cost savings. Prior to assembly, remove the needed parts from the sprues using a sharp hobby knife. If assembling the 6 inch, two-crossarm poles, each “stack” of 4 crossarms should be cut into a “stack” of just two crossarms. Next, a small amount of liquid plastic cement should be applied to the mounting pins on the back of the crossarms. The pins are then gently inserted into the holes located on the poles. Once the cement has dried and the bond is solid, the poles are ready to install on the layout. Simply insert the pin on the bottom of the pole into a 5/32” hole drilled at the desired location on the layout. Bases are not included in the bulk packs, but if you prefer to mount the poles using this method, they may be ordered.
CUSTOMIZING
Prototype line poles exist in an almost infinite number of varieties which can be easily modeled using the unassembled bulk packs. For example, on heavily used mainlines, the line poles often were built using up to eight crossarms. These can be modeled by installing additional crossarms on the nine inch poles. Prior to installing the extra crossarms, the small mounting pins will need to be removed using a hobby knife. Where fewer communication lines were needed, less crossarms would be mounted to the poles. In the case of the 6 inch poles, this can be modeled by simply mounting a single crossarm on the pole, and filling in the unused hole with modeling putty. Similarly, three crossarm, 9 inch poles may be created by removing a crossarm from each “stack” of four, and filling in the unused hole.
On lightly used branch lines, the crossarms often were shorter and had only six insulators. This can be modeled by cutting 7/16” (including two insulators) off both ends of the crossarms.
In order to connect the signaling wires on the line poles to the signals and relay boxes along the tracks, cables were hung from special line poles which connected them to the signaling equipment. These line poles were built using double sets of crossarms mounted on both sides of the poles. They can easily be modeled by removing the mounting pins from the crossarms, and mounting a second set of crossarms on the poles.
Shorter poles may be created by simply drilling a hole the same diameter as the pole, and inserting the assembled model to the desired depth.
PAINTING AND FINISHING
Weaver Model's line poles have been molded in traditional brown, and can be used unpainted on all layouts. Greater realism can be achieved through painting. Prototype line poles are often light brown or various shades of gray depending on their age, sun exposure, and climate. For those wishing to paint their poles, we recommend Scalecoat II Paint, #S2021-Roof Brown & #S2032-UP Harbor Mist Gray.
The insulators are usually made of glass, and are generally clear or various shades of green when new. Often, they would slowly become discolored over time, frequently becoming purple, as a result of sunlight interacting with impurities in the glass.
If you desire to paint the insulators the correct color, P742, Scalecoat II Insulator Glass Green Paint, is available in 1-ounce bottles.
Finally, the “V” shaped metal braces which support the crossarms may be painted a dark gray color with hints of rust, depending on the age of the pole.
ASSEMBLED POLES
Both the 6 and 9 inch assembled poles come ready to use on your model railroad. They can be mounted using either the enclosed oval bases, or by inserting the pin on the end of the pole directly into a hole drilled in the layout. If using the bases, simply twist them or cut them from the sprue using a sharp hobby knife. If you prefer to mount them using the pin, drill a 5/32” hole at the desired location.
ORDER NOW FOR DELIVERY IN NOVEMBER 2011 — SOME AVAILABLE NOW


jkb


